Pesto traditionally uses expensive ingredients like Pine Nuts and Parmazan cheese, which if you're like me, you don't tend to stock everyday. So, here is a nice and easy variation on this, that won't cost the earth and with ingredients you're bound to have at home.
1 Courgette, sliced into long strips
300g Dried Pasta Shapes (any variety)
Pesto Sauce:
1 small handfull of Basil
1 small handfull of Mint
1 small handfull of Baby Spinage Leaves
1 small handfull of Rocket Leaves
2 Garlic Cloves, grated
120g Nuts - peanuts, brazil nuts, etc...
100g Feta Cheese
150ml Olive Oil
1/2 Lemon
For this recipe, start by cooking the pasta of your choice in sligthly salted water in a pan and cook as instructed on the packet.
While the pasta is cooking, in a small blender add the herbs, salad leaves, grated garlic, selection of nuts and lemon juice and blitz until roughly chopped. Add half of the oil gradually to the mixture and blitz to a paste, then add the rest of the oil. This can then be put into the fridge till needed.
Heat a griddle and cook the courgette strips, which have been cut into slices with a potato peeler, for a couple of minutes on each side until they browned off. Once cooked place on some kitchen towel cool down.
Once cooked drain the pasta and place in a bowl. Pour the pesto sauce over the pasta and crumble over the feta cheese. Mix together, move to a serving bowl, place the courgette over and add more cheese, oil and lemon as needed
The pesto sauce can be kept in a container and stored in the fridge for up to a couple of weeks if needed.
Showing posts with label Herbs. Show all posts
Showing posts with label Herbs. Show all posts
Friday, 10 August 2018

Friday, 23 March 2018
Spring Plans for 2018
So there has been some time since we have last posted on the Blog.
It has been a busy family time last year with a new member of the family "Marley Bloom" and Oscar is growing up so fast!

But with a new season comes a new plan!


Also just started Propagating some Pumpkin plants and looking good only 1 week old.

Also Catnip...

It has been a busy family time last year with a new member of the family "Marley Bloom" and Oscar is growing up so fast!

But with a new season comes a new plan!
So with the help from a lovely gardening app we have planned out this years veg garden.

So far we have 4 different Basil plants on the go...Thai, Genovese, Dark Opal, Lemon
2 Weeks old:

In time will look like the following:
 |
| Dark Opal |
 |
| Lemon |
 |
| Thai |
 |
| Genovese |
We also planted outside our Garlic Bulbs "Provence Wight" (just before the winter frost) and there are looking very happy!

Also just started Propagating some Pumpkin plants and looking good only 1 week old.

Also Catnip...

Friday, 5 October 2012
New Home for The Little Balcony
Sadly last weekend The Little Balcony was packed up and taken to a new location. Our current London flat was sold, which we had been planning for a whole and in a very mad last minute rush, due to a last minute change, we moved to a new rented London flat, which unfortunately does not have a garden or a balcony, as I had hoped.
During the move, I had to get rid of all the vegetable plants, which included the last of the Tomatoes, Chilies and Courgettes; luckily it was coming to the end of the session so these were ready to be thrown away. Otherwise along with the Herbs, the Brussels Sprout plant, which is still growing away and the Strawberry plants, these were all taken to my mum’s house up north in Chester, which will be their new home.
I am a little sad about this, as I won't be able to plant anything new next year, but it will give me time to start on the cook book, which I've been trying to get off the ground for the last couple of years. Hopefully we will be moving somewhere new in about six months and a garden/balcony is high on my list.
Having said that I did manage to keep a few plants, which hopefully will survive indoors on the kitchen windowsill, I have a Lavender plant, the Vietnamese Coriander plant, a Parsley plant and two Chili plants, which are still flowering and then all the other house plants.
During the move, I had to get rid of all the vegetable plants, which included the last of the Tomatoes, Chilies and Courgettes; luckily it was coming to the end of the session so these were ready to be thrown away. Otherwise along with the Herbs, the Brussels Sprout plant, which is still growing away and the Strawberry plants, these were all taken to my mum’s house up north in Chester, which will be their new home.
I am a little sad about this, as I won't be able to plant anything new next year, but it will give me time to start on the cook book, which I've been trying to get off the ground for the last couple of years. Hopefully we will be moving somewhere new in about six months and a garden/balcony is high on my list.
Having said that I did manage to keep a few plants, which hopefully will survive indoors on the kitchen windowsill, I have a Lavender plant, the Vietnamese Coriander plant, a Parsley plant and two Chili plants, which are still flowering and then all the other house plants.
Wednesday, 16 May 2012
Linguine & Chargrilled Veg in a Passata Sauce
1 Pepper (sweet)
1 Courgette - sliced with a potato peeler
1 tbsp of Chili Oil
1 Jar of Roasted Passata Sauce (see Recipe)
1 Large handful of Linguine Pasta
Salt & Pepper to season
Heat a griddle and add the Chili Oil, cut the pepper into large slices and grate the Courgette lengthways, to create large slices. Add these to the oil once smoking and cook till they are tender and brown. Remove and place to kitchen towel to drain excess oil and leave to cool.
I've used Linguine pasta, but any pasta will do. Place the pasta into a pot of salty water and cook as directed, for the Linguine I tend to snap this in half, as I don't like the pasta too long. Once cooked drain and run through cold water.
Add the Roasted Passata Sauce to a large pan and heat slowly over a medium heat, after a few minutes and when the sauce beings to bubble, add the Courgettes and Peppers (sweet) which can cut into smaller pieces, to the sauce, warm for a few minutes and then add the pasta, season with salt and pepper as required. Once everything is boiling away and heated through, pour into a large bowl and enjoy.
As a side dish, why not try my Homemade Chili and Garlic Bread:
Slices of French bread
Butter
Chopped Garlic
Chopped Chili
Dried or Fresh chopped Mixed Herbs
Salt & Pepper to season
This is very simple to make and you can make as much or as little as you like, mix the butter, garlic, chili and mixed herbs together to make a paste, then season as required and then spread onto the French bread, which has been cut into circular slices. Place on a baking tray and cook in the oven until brown.
Another great recipe for the Cook Book.
1 Courgette - sliced with a potato peeler
1 tbsp of Chili Oil
1 Jar of Roasted Passata Sauce (see Recipe)
1 Large handful of Linguine Pasta
Salt & Pepper to season
Heat a griddle and add the Chili Oil, cut the pepper into large slices and grate the Courgette lengthways, to create large slices. Add these to the oil once smoking and cook till they are tender and brown. Remove and place to kitchen towel to drain excess oil and leave to cool.
I've used Linguine pasta, but any pasta will do. Place the pasta into a pot of salty water and cook as directed, for the Linguine I tend to snap this in half, as I don't like the pasta too long. Once cooked drain and run through cold water.
Add the Roasted Passata Sauce to a large pan and heat slowly over a medium heat, after a few minutes and when the sauce beings to bubble, add the Courgettes and Peppers (sweet) which can cut into smaller pieces, to the sauce, warm for a few minutes and then add the pasta, season with salt and pepper as required. Once everything is boiling away and heated through, pour into a large bowl and enjoy.
As a side dish, why not try my Homemade Chili and Garlic Bread:
Slices of French bread
Butter
Chopped Garlic
Chopped Chili
Dried or Fresh chopped Mixed Herbs
Salt & Pepper to season
This is very simple to make and you can make as much or as little as you like, mix the butter, garlic, chili and mixed herbs together to make a paste, then season as required and then spread onto the French bread, which has been cut into circular slices. Place on a baking tray and cook in the oven until brown.
Another great recipe for the Cook Book.
Friday, 17 February 2012
The First Sow Of The Year
Over the recent snowy weekend, I started to sow my first batch of seeds of the year, which I always start at this time of the year (mid February). Having already sorted through all the seeds I've managed to collect, earlier in the month, I then got to prepping for this years vegetable sowing.
 Photo: Laura Lunt Date: February 2012
Tools
6cm Pots
Compost (peat free)
Spoon
Watering Can
Newspaper
Label Sticks / Pen
Seed Trays
As I only have a small balcony, seed sowing for me, usually happens on my dinning room table, which is covered with newspaper. Having selected the types of vegetables I wanted to grow (see picture & list below), I would have normally sown these into my propagator, into individual pods, but this year I have decided to sow the seeds into small 6cm pots, as I have a lot of different vegetables I'd like to sow.
I filled each pot with peat free compost, leaving a 1.5cm gap from the top, watered them and then added 5-7 seeds to each separate pot, making sure I added a label stick so I knew what was in each pot. A small layer of compost was then laid on top of the seeds and these were then placed into a seed tray. After all the seeds were sown, and they had been carefully placed in seed trays and then placed on a south-east facing windowsill, around 2cms of water was added to the trays, and has been carefully topped up when needed.
 Photo: Laura Lunt Date: February 2012
Vegetable Seeds
Tomatoes (x3 varieties) - Moneymaker / Gardeners Delight and Roma VF (Plum)
Chilies (x5 varieties) - Thai Dragon / Inferno / Tabasco / Pepper (Hot) Hotscotch and Pepper Cayenne
Peppers (sweet)
Parsnip Duchess F1
Brussels Sprout Evesham Special
Sweet Pea (Old Spice Mixed)
Aubergines Black Beauty Organic
Herb Seeds
Chives
Basil Sweet Genovese
Dill
I haven't covered these with any form of lid, as I'd like to see how they do without this, and as they are in the sunniest part of the flat, over a radiator, I'm sure it won't harm them. In fact, its now been a week since these have been sown and I already have Sprout and Sweet Pea seedlings appearing.
 Photo: Laura Lunt Date: February 2012
The herb seeds were sown into re-useable herb pots, which my boyfriend bought last year. The pots were put through the dishwasher, before being used again. As with the vegetable seeds these were also filled with peat free compost, watered, seeds added and then filled with more compost, and then watered again.
 Photo: Laura Lunt Date: February
Now everything is happily sitting on the windowsill and I just have to wait for even more little seedlings to appear over the coming weeks and the sun to come out.
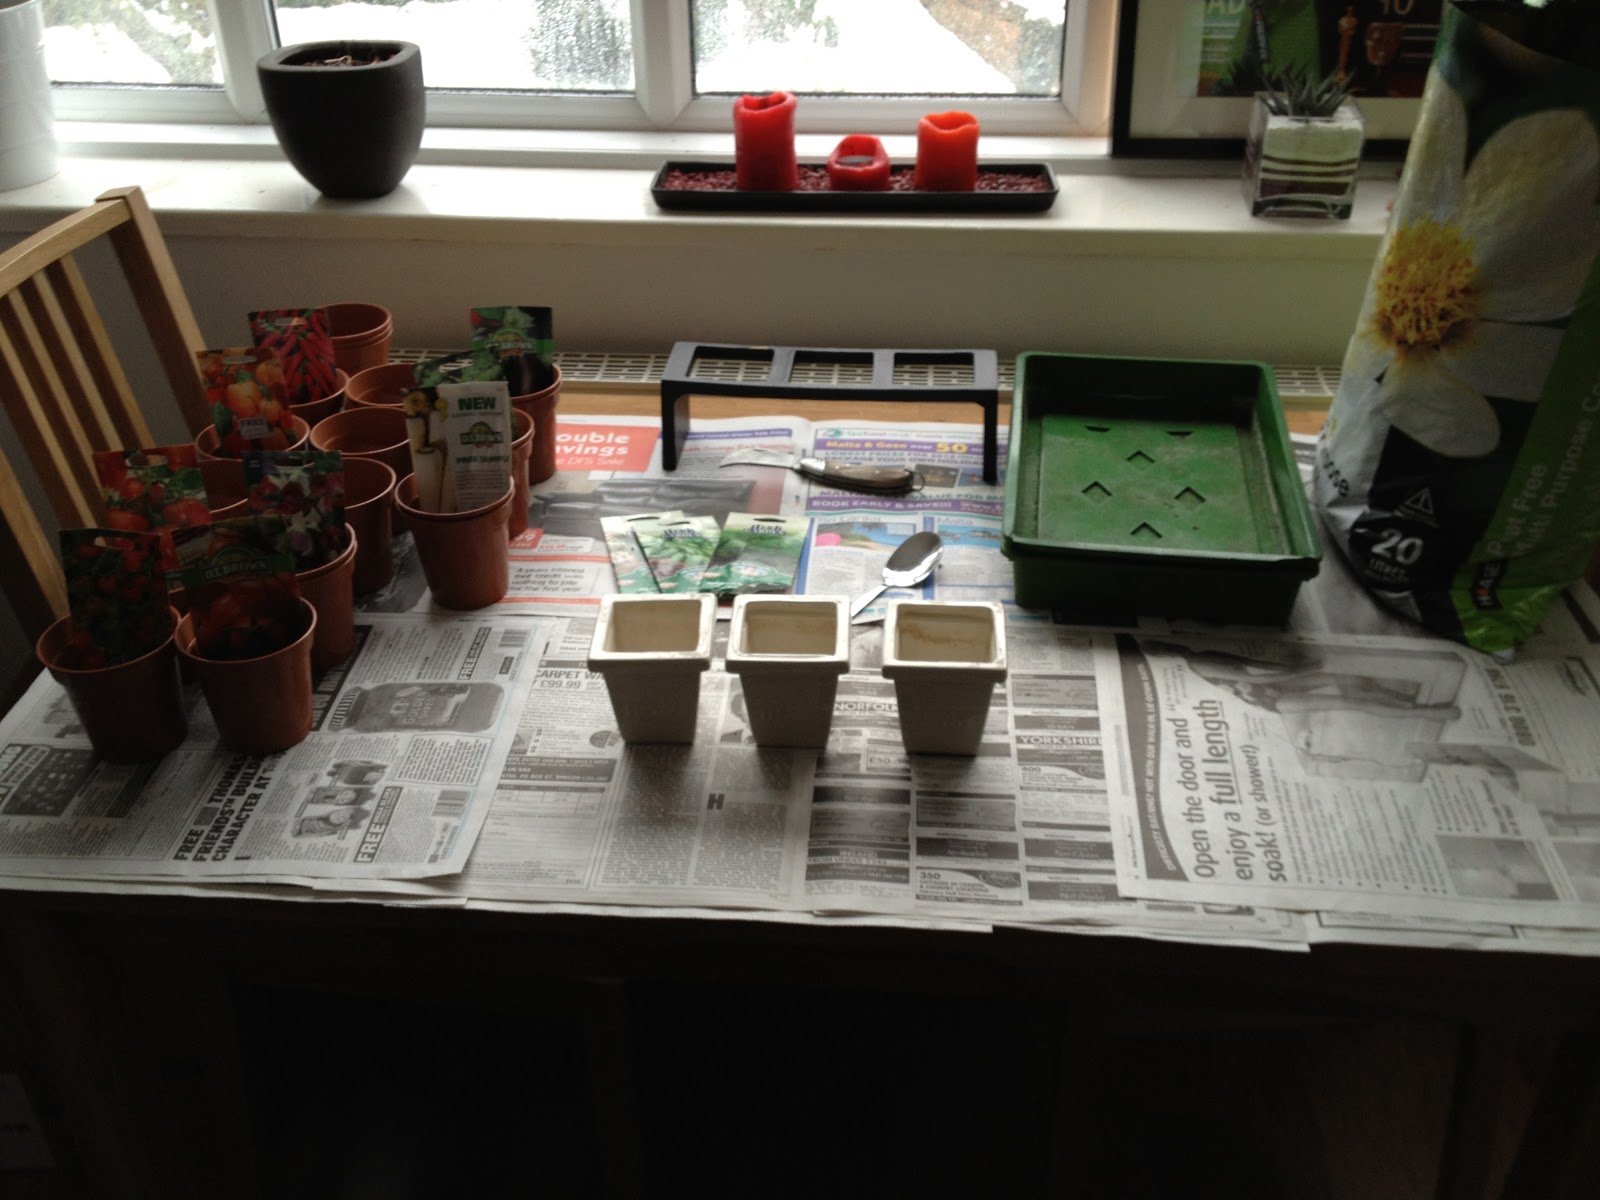
Tools
6cm Pots
Compost (peat free)
Spoon
Watering Can
Newspaper
Label Sticks / Pen
Seed Trays
As I only have a small balcony, seed sowing for me, usually happens on my dinning room table, which is covered with newspaper. Having selected the types of vegetables I wanted to grow (see picture & list below), I would have normally sown these into my propagator, into individual pods, but this year I have decided to sow the seeds into small 6cm pots, as I have a lot of different vegetables I'd like to sow.
I filled each pot with peat free compost, leaving a 1.5cm gap from the top, watered them and then added 5-7 seeds to each separate pot, making sure I added a label stick so I knew what was in each pot. A small layer of compost was then laid on top of the seeds and these were then placed into a seed tray. After all the seeds were sown, and they had been carefully placed in seed trays and then placed on a south-east facing windowsill, around 2cms of water was added to the trays, and has been carefully topped up when needed.

Vegetable Seeds
Tomatoes (x3 varieties) - Moneymaker / Gardeners Delight and Roma VF (Plum)
Chilies (x5 varieties) - Thai Dragon / Inferno / Tabasco / Pepper (Hot) Hotscotch and Pepper Cayenne
Peppers (sweet)
Parsnip Duchess F1
Brussels Sprout Evesham Special
Sweet Pea (Old Spice Mixed)
Aubergines Black Beauty Organic
Herb Seeds
Chives
Basil Sweet Genovese
Dill
I haven't covered these with any form of lid, as I'd like to see how they do without this, and as they are in the sunniest part of the flat, over a radiator, I'm sure it won't harm them. In fact, its now been a week since these have been sown and I already have Sprout and Sweet Pea seedlings appearing.

The herb seeds were sown into re-useable herb pots, which my boyfriend bought last year. The pots were put through the dishwasher, before being used again. As with the vegetable seeds these were also filled with peat free compost, watered, seeds added and then filled with more compost, and then watered again.

Now everything is happily sitting on the windowsill and I just have to wait for even more little seedlings to appear over the coming weeks and the sun to come out.
Friday, 3 February 2012
Preserves: Roasted Tomato Passata
Last year I grew a lot of Tomatoes, so I decided to create some Tomato Passata. I've never done this before, so after some research on the internet, including watching a few cooking demo videos, I decided to use the recipe from the book 'Preserves: River Cottage Handbook No2', which I'd recently bought.
This Roasted Tomato Passata recipe makes 2x 500ml Jars:
2kg Ripe Tomatoes
200g Shallots, peeled and thinly sliced
3-4 Garlic Cloves, peeled and thinly sliced
A few Rosemary, Thyme, Basil or Oregano sprigs
1tsp Salt
1/2 tsp Ground Black Pepper
1tsp Sugar
50ml Olive, Sunflower or Rapeseed Oil
Pre-heat oven to 180c / gas mark 4
Firstly cut all the tomatoes in half, place them cut side up in a single layer in a large pot. Then scatter the shallots, garlic, herbs, salt, pepper, sugar and oil. This then needs to be roasted for 1 hour or until everything is well softened. Remove the pot from the oven and rub the entire content through a nylon slieve or puree with a passata machine or mouli.
 Photo: Laura Lunt Date: September 2011
Make sure you have the hot sterilised jars ready, put the tomato puree into a sauce pan and bring it to a boil, once its boiled pour into the jars, filling them to the brim and seal, depending on the jars.
Stand the jars in a large pan with a towel at the bottom and over everything with warm water, bring to a simmering point (which is 88c) over a period of 25 minutes, using a thermometer will help here and then simmer for 10 minutes.
 Photo: Laura Lunt Date: September 2011
After simmering, remove the jars from the pan and stand them on a wooden surface or folded towel. Leave undisturbed until cold, then check the seal. These can be stored and used within 12 months. Once opened, refrigerate and use within a few days.
 Photo: Laura Lunt Date: September 2011
This Roasted Tomato Passata recipe makes 2x 500ml Jars:
2kg Ripe Tomatoes
200g Shallots, peeled and thinly sliced
3-4 Garlic Cloves, peeled and thinly sliced
A few Rosemary, Thyme, Basil or Oregano sprigs
1tsp Salt
1/2 tsp Ground Black Pepper
1tsp Sugar
50ml Olive, Sunflower or Rapeseed Oil
Pre-heat oven to 180c / gas mark 4
Firstly cut all the tomatoes in half, place them cut side up in a single layer in a large pot. Then scatter the shallots, garlic, herbs, salt, pepper, sugar and oil. This then needs to be roasted for 1 hour or until everything is well softened. Remove the pot from the oven and rub the entire content through a nylon slieve or puree with a passata machine or mouli.

Make sure you have the hot sterilised jars ready, put the tomato puree into a sauce pan and bring it to a boil, once its boiled pour into the jars, filling them to the brim and seal, depending on the jars.
Stand the jars in a large pan with a towel at the bottom and over everything with warm water, bring to a simmering point (which is 88c) over a period of 25 minutes, using a thermometer will help here and then simmer for 10 minutes.

After simmering, remove the jars from the pan and stand them on a wooden surface or folded towel. Leave undisturbed until cold, then check the seal. These can be stored and used within 12 months. Once opened, refrigerate and use within a few days.

Wednesday, 18 January 2012
New Wooden Seed Box
As my seed collection has been growing and growing over the last year, I've been keeping these in a small plastic box along with other useful garden impliments, such as string, veg labels etc. So I've been considering buying a new seed box, now I did add this to my Christmas list, but it didn't seem to make it under the tree.
Since then I've had a quick scout around on a few of my favorite gardening sites and they all seemed a little steap in price, even in the sales. But luckerly, I noticed in my office that the packaging from a wine box gift set was going to be thrown away, which I decided to grab, so instead of buying one, I decided to recycle this box and use it instead. The wooden box has a sliding lid and inside it is divided into two, with just enough room to fit seed packets in.
 Photo: Laura Lunt Date: 11/01/12
Since then I've had a quick scout around on a few of my favorite gardening sites and they all seemed a little steap in price, even in the sales. But luckerly, I noticed in my office that the packaging from a wine box gift set was going to be thrown away, which I decided to grab, so instead of buying one, I decided to recycle this box and use it instead. The wooden box has a sliding lid and inside it is divided into two, with just enough room to fit seed packets in.

Subscribe to:
Posts (Atom)