Showing posts with label Sowing. Show all posts

Sunday, 1 July 2012

Courgettes Two Types

It didn't take long for the Courgettes to start growing, once sown. Within a week two of these were popping out of the propagator soil, I have one Courgette 'Tondo di Piacenza' which is a round variety and one Courgette 'All Green Bush', which is a normal long variety.

                                         Photo: Laura Lunt  Date: June 2012

These have now been planted outside, as I lost a couple of the Strawberry plants, I've placed the round Courgette variety in here and potted another one up in another individual pot.

                                                    Photo: Laura Lunt  Date: June 2012

Friday, 17 February 2012

The First Sow Of The Year

Over the recent snowy weekend, I started to sow my first batch of seeds of the year, which I always start at this time of the year (mid February). Having already sorted through all the seeds I've managed to collect, earlier in the month, I then got to prepping for this years vegetable sowing.

                                                       Photo: Laura Lunt  Date: February 2012

Tools
6cm Pots
Compost (peat free)
Spoon
Watering Can
Newspaper
Label Sticks / Pen
Seed Trays

As I only have a small balcony, seed sowing for me, usually happens on my dinning room table, which is covered with newspaper. Having selected the types of vegetables I wanted to grow (see picture & list below), I would have normally sown these into my propagator, into individual pods, but this year I have decided to sow the seeds into small 6cm pots, as I have a lot of different vegetables I'd like to sow.

I filled each pot with peat free compost, leaving a 1.5cm gap from the top, watered them and then added 5-7 seeds to each separate pot, making sure I added a label stick so I knew what was in each pot. A small layer of compost was then laid on top of the seeds and these were then placed into a seed tray. After all the seeds were sown, and they had been carefully placed in seed trays and then placed on a south-east facing windowsill, around 2cms of water was added to the trays, and has been carefully topped up when needed.

                                                       Photo: Laura Lunt  Date: February 2012

Vegetable Seeds
Tomatoes (x3 varieties) - Moneymaker / Gardeners Delight and Roma VF (Plum)
Chilies (x5 varieties) - Thai Dragon / Inferno / Tabasco / Pepper (Hot) Hotscotch and Pepper Cayenne
Peppers (sweet)
Parsnip Duchess F1
Brussels Sprout Evesham Special
Sweet Pea (Old Spice Mixed)
Aubergines Black Beauty Organic

Herb Seeds
Chives
Basil Sweet Genovese
Dill

I haven't covered these with any form of lid, as I'd like to see how they do without this, and as they are in the sunniest part of the flat, over a radiator, I'm sure it won't harm them. In fact, its now been a week since these have been sown and I already have Sprout and Sweet Pea seedlings appearing.

                                                                    Photo: Laura Lunt  Date: February 2012

The herb seeds were sown into re-useable herb pots, which my boyfriend bought last year. The pots were put through the dishwasher, before being used again. As with the vegetable seeds these were also filled with peat free compost, watered, seeds added and then filled with more compost, and then watered again.

                                                       Photo: Laura Lunt  Date: February

Now everything is happily sitting on the windowsill and I just have to wait for even more little seedlings to appear over the coming weeks and the sun to come out.

Friday, 10 February 2012

Chili & Pepper (Sweet) - Mystery Seeds?

It seems though I thought I'd be doing a great thing by saving my Chili and Pepper (sweet) seeds, it has been pointed out me to that these may not be exactly true to type, when it comes to sowing them. Some very good advice from a fellow UK Veg Garderners gardener has let me know that as a rule of thumb, different varieties of Chilies and Peppers (sweet) should either be planted at least four miles apart or they should be grown under insect proof nets, for the plants to produce seeds true to type.

I've planted my 'so called' Chili and Pepper (sweet) seeds under their original names but it seems, I may actually end up with very different varieties such as 'Thai Tabasco' or 'Inferno Dragon' and maybe even a not so cool Pepper (sweet).

I'm very excited about this, as I had no idea about the possibility of it happening, but everything is now planted and all's I have to do is just wait and see.


Wednesday, 1 February 2012

Collecting Chili & Pepper Seeds

In a bid to save on buying seeds or new plants, this year I've tried to save some seeds from a few plants I've grown. I've specifically planned to save those from my different Chili varieties and Pepper (Sweet) plants:

Thai Dragon Chili Seeds
Tabasco Seeds
Inferno Seeds
Pepper (sweet) Seeds

Saving these was very easy, for the Pepper (Sweet) when going to cooking these; I saved as many seeds as possible from inside the Pepper, placed them in a small open bowl, left them in a light but not sunny area and waited for them to dry out naturally. The same was done for the Chilies, but I did allow some of the Chilies to dry out naturally before de-seeding.

Drying out took a few days to a week, and they should stay the same natural light colour as they were inside the vegetable, I have done this before and by mistake placed in direct sun, to which the seeds burned and turned a dark brown colour, not good. Also, it is handy to label the bowls, I forgot to do this and ended up having to lick a seed to see if it was a Pepper or Chili seed, turned out to be Chili and it was very hot.

                                                                  Photo: Laura Lunt  Date: January 2012

I now have a lot of seeds collected and some will be sown for this year, which I should hopefully to doing very soon. For the rest, I've decided to create a little seed collection gift pack, which I'll be sending out to a few family members and friends, and hope they have fun growing them this year along with me.

Monday, 23 January 2012

Prep for the 2012 Balcony

One of my first planned jobs for the 2012 balcony garden, which I've been doing over the last two weeks, has been to create a list of all the seeds I've been collecting. These have either been bought or have come free in garden magazines.

I've collated them all into a handy excel growing chart (this does look better in excel), along with the last year of sowing, best sowing and planning out months and when to harvest, see chart below:


Hopefully the chart is going to come in very handy, when I start sowing seeds for the New Year and also in planning what I can grow over the months ahead. I'm hoping I can keep a steady supply of vegetables growing this year, as last year I only tended to sow a few things at the beginning of the year and then not a lot after that, until the Autumn / Winter months started.

Prep will soon start on sowing Aubergines, Peppers (sweet), Chili Peppers (Thai Dragon / Tabasco / Inferno), Sweet Peas and Tomatoes, once I've had a quick trip to the local garden centre for new compost and maybe a few more Leeks, though I already have a few overwintering at the moment, there may be room for a few more.

Wednesday, 18 January 2012

New Wooden Seed Box

As my seed collection has been growing and growing over the last year, I've been keeping these in a small plastic box along with other useful garden impliments, such as string, veg labels etc. So I've been considering buying a new seed box, now I did add this to my Christmas list, but it didn't seem to make it under the tree.

Since then I've had a quick scout around on a few of my favorite gardening sites and they all seemed a little steap in price, even in the sales. But luckerly, I noticed in my office that the packaging from a wine box gift set was going to be thrown away, which I decided to grab, so instead of buying one, I decided to recycle this box and use it instead. The wooden box has a sliding lid and inside it is divided into two, with just enough room to fit seed packets in.

                                                          Photo: Laura Lunt  Date: 11/01/12


The Little Balcony 2012

As regular readers of The Little Balcony will know, I started documenting the coming and goings of balcony growing life through my blog, in early June of last year. Our new London flat's balcony was a great little experiment to try and see what could and could not grow, having only ever had a very tiny balcony before this one, I through myself into this and six months on, I have learned so much more than I ever through I would.

The New Year is now upon us and this year I want to take everything I learned from last year and make the balcony even better, this year. Planning has already begun, with a stock check of seeds and I've been keeping a close eye on the Onions, Garlic, Cabbage, Carrots and Leeks which have been overwintered from late last year, along with the Strawberry Runners. I would have preferred a colder winter, maybe even some snow to help everything a long, but I keep peeking outside and they all seem to be doing well regardless.

Vegetable sowing and growing plans are in the early stages, while doing the seed stock check; I've also been putting a growing chart together for what I have also, so I'm able to plan out the best way to fit all of the different crops into the balcony. I'm not giving any hints away as of yet, but there will be some second goes at vegetables that didn't grow very well last year and a few new ones that I've been desperate it try out.

As for the cook book, I really must say that last year I didn't do a lot on this, as I wanted to concentrate more on the balcony and seeing what I could grow. Having taken the time to do this, as well as using all the vegetables grown to test out recipes, I'm now ready to start putting the first draft together and I'll hopefully have the book complete soon.


Wednesday, 17 August 2011

What to Grow over Winter?

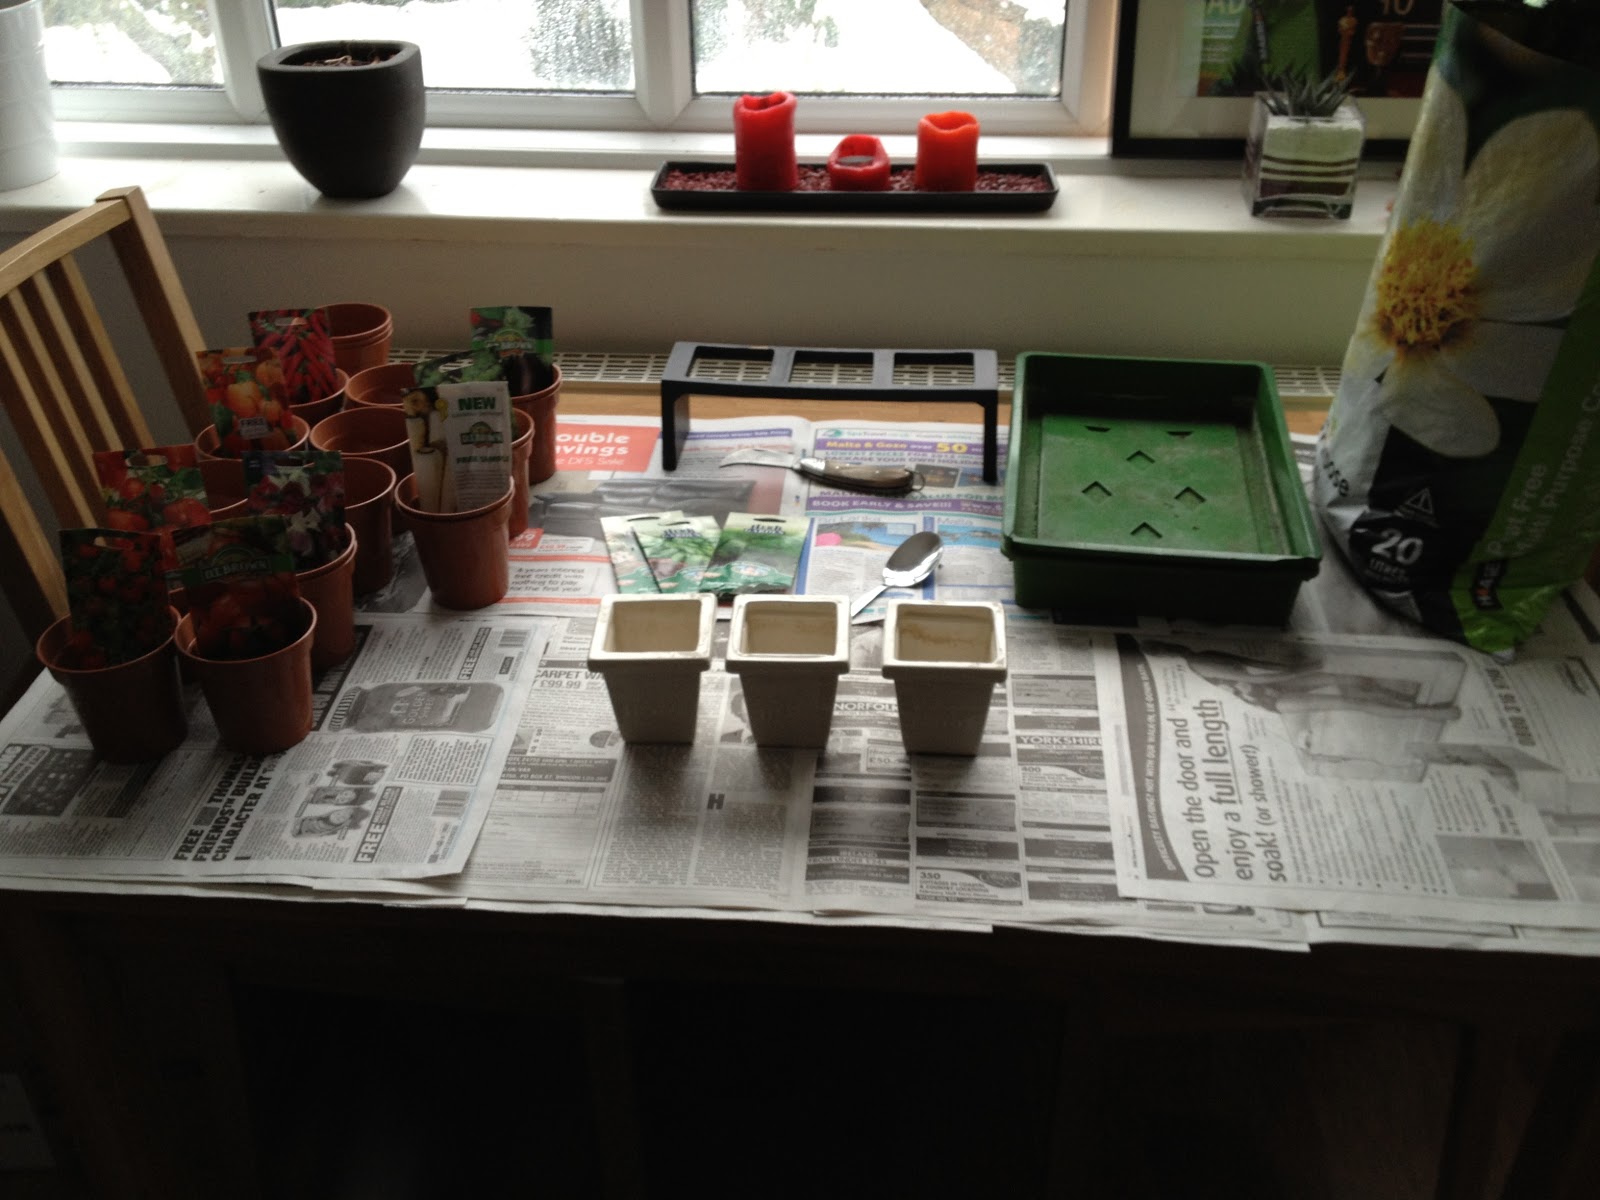
Autumn / Winter growing has always been a mystery to me. I normally just leave the balcony bare and wait for February to come before planting seeds for the summer. But this year I have a few ideas about what to grow, normally I'm not a great Winter grower, but I've been researching some vegetables that can be grown over the Winter months, for early harvesting in May / June.


I decided on the selection of vegetables in the table above. For me Onions and Garlic were a must have, I've gone for Onion Radar Sets and Early Purple Wright Garlic Bulbs (soft neck), both easy to grow and won't bolt in the winter months, so I should get a good growth. It was pointed out to me that Onions can be planted in early March and still arrive June / July time, but I'd like to try these over winter and I will save some for planting in March just in case disaster strikes.

During my research I also found that Winter greens were good to plant, such as Spring Cabbage, Pak Choi and Leeks, now I'm a little late with the planting of my Elefant Leeks (this should have been done last month, as the packet states) but as I'm growing from seed in a propagator indoors, I'm hoping this will help give them a good start. The Pak Choi seeds, free from Garden Kitchen, have been planted straight outside and have replaced the earlier pulled carrots from their pot. These were just sprinkled into the pot, covered with a layer of compost and watered well. The Spring Cabbage I've gone for is Cabbage Advantage F1 seeds, these are good for planting all year around, from March to September, so I should be able to keep a very good supply going.

I also had some leftover Onion (Spring) White Lisbon Winter Hardy seeds, which can be planted up till September and will stand over winter so they can be used in Spring. The only thing left to sow in the propagator is of course the Carrots, I've opted for the Carrot Early Nantes 2 another variety that should have been sown in July, but fingers crossed, they should be fine in the propagator and hopefully I'll have some ready for Christmas time.

As I only have a small Balcony, I'm hoping this will be enough to see me through and keep me busy during the Autumn / Winter months and hopefully I'll have plenty to harvest, leading up to the Summer seed planting I'll begin in February.

    Wednesday, 10 August 2011

    Outdoor Peppers

    Normally I'd grow my Peppers indoors on a sunny windowsill, along with the Chilies, but they don't seem to really produce a lot of Peppers, so this year I decided to plant them outdoors. As like most things these plants started life as seeds. They were planted in the propagator in early February like all the others and left to germinate.

                                                                         Photo: Laura Lunt  Date: June 2011

    Once they got to a good handling size, they were potted into small pots and left to grow to around 10-12cms on a sunny south-east facing windowsill and watered regularly. These were then hardened off, during the day outside and brought in during the night chills, during March / April.

    Peppers I've always found are easy to grow just like Chilies and as like, over the many years I have grown these, they grew very quickly again this year. The three Pepper plants have been outside now since mid April, when they were repotted into their larger final pots. These contained multi-purpose compost and water crystals and have been watered at least once a day and feed every 10-14 days, once flowers appeared.

                                                                          Photo: Laura Lunt  Date: August 2011 
    Due to the restriction of their pots they have grown to no more than around 30cm and have been flowering for some time now. Along with the flowers I also have at least six Peppers growing, on two of the plants, which are almost the size of golf balls and are a luscious deep green colour.

    Friday, 5 August 2011

    Slow Growing Courgettes

    Another vegetable I've never grown before is the Courgette, I eat my fare share throughout the year, so I though I may as well try to grow some. The seeds for these came free with the garden magazine 'Grow Your Own', which I did plant a little late in the season around March-April. These were put into small pots filled with Multi-purpose compost, watered and then placed straight outside in a tray which could be topped up with water easily. I did tend to bring these inside during the night, as I felt it may benefit them and it also helped to harden them off as they grew.

                                                                         Photo: Laura Lunt  Date: June 2011

    I was surprised that they grew very quickly, I only grew four plants, as I'd decided to place then in one of my plastic circle planter bags, and four seemed the ideal amount. As I used quiet large pots 10-12cm pots, I kept them in these till they started to grow out of them and the roots could be seen appearing through the bottom. I then re-potted them in the planter bag, which also contained multi-purpose compost and the usual water crystals, and watered well. The Courgettes plants from this point on have been watered everyday and feed every two weeks with tomato feed.

    These grew very well and seemed to thrive on the balcony, the flowers started it appear, but by mid June / early July, I still hadn't seen any Courgettes emerging. A little concerned I did some research on a few garden websites and found that Courgettes tend to grow male flowers first and later, when pollinated, the female flowers will emerge with the vegetables underneath. So I crossed my fingers and hoped for the best.

                                                                          Photo: Laura Lunt  Date: July 2011

    It's taken a few weeks, but now in early August I think I spotted my first Courgette growing, while out watering the balcony earlier this week.

    Friday, 15 July 2011

    Carrots All Year Around

    Known to be one of the easiest vegetable to grow, I thought I'd have a try at growing Carrots this year. Now as I noticed when I headed down to my local garden center, these a very large selection of Carrot seeds, all shapes, sizes and not always the traditional orange colour. As I've never grown these before I went for a small variety called, Carrot Atlas.

    As with all of my other seeds, these were sown in mid February, in the propagator. Not really knowing how many seeds to sow as they are very small, I just added a small sprinkle to five of the sections in the propagator and hoped for the best. As the weeks went by small little shoots started to show, once they grew to a suitable handling length, around March / April, these were then planted straight outside into a tall pot of multi-Purpose compost, with water crystals added and were then well watered.

    From this point on I just kind of left them to it. They do say you should thin these out, to stop the carrots growing too close together, I did do this a little but I found the weaker shoots tended to die off naturally and of course I've watered these at least every day if not every other day. Plus I've fed with tomato feed every 10-14 days.


                                                 Photo: Laura Lunt  Date: July 2011


    We're now in mid July and they seem to have grown very well, my last look saw a count of around eight Carrots popping out, they have also just started to turn orange underground and I hope they will be ready to pull soon.

    Winter Carrots - I've already been researching a winter Carrot variety that I can start planting in Mid Autumn, Carrot Nando Seeds, I'm hoping to order these soon and start prepping for Christmas Carrots for the family.

    Wednesday, 22 June 2011

    Tomato Plants for the Summer

    I have been growing Tomato plants for around 5 years now. My first plants came from my mother, like me she always grows more that she needs, I remember taking them thinking 'lets try not to kill these' and within a few months I had lush red Tomatoes growing crazily in the small back yard, which I made into great Tomato sauces all summer.

    Due to this success, the following year I decided to grow my own and I headed to the local garden centre to pick up some seeds. I never really know which brands or types to buy, so I tend to pick the types I get at the supermarket, such as plum and baby Tomatoes, which I've grown successfully year after year.

    This year I've grown Gardener's Delight and Moneymaker varieties from seed (both collected from garden magazines). In late February I placed 2 to 3 seeds in two rows of my propagator, which all germinated very quickly and any unsuitable weedy plants were removed. Once they grew to a suitable 5cm to 6cm, these were transferred into small individual pots, placed in a tray which was kept topped up with water daily and left on a very sunny south-east facing windowsill. These were again left to grow to at least 15cm to 20cm in size and once the frost started to disappear, during April, they were taken outside during the day to harden off, but always brought back in and placed on the windowsill during the night.

                                                                                        Photo: Laura Lunt  Date: June 2011

    After hardening for at least two week, the plants were ready to be placed in their last growing place, a very large patio planter bag, filled with muti-compost and water crystals. Due to my large amount of Tomato plants (12 in total) only 6 of these were put into the planter and another six were placed into larger plant pots, all with small cane supports, which will be removed and given larger canes as the plants grow bigger. These have been watered at least every other day if not every day since being planted out.

                                                                                        Photo: Laura Lunt  Date: June 2011

    It is now Mid June, the Tomato plants have grown to around 4ft and the first signs of flowers are just developing. I've been pinching out the small shoots that have been appearing between the branches and as a little added bonus I have been feeding the plants with Tomato feed, a few times, just to help encourage growth and this will now continue every 10-14 days, while the plants flower and grow the Tomatoes.

    Sunday, 12 June 2011

    From Seeds to Plants

    Having just moved into a new flat with a great size balcony, late last year, the preparation for this years crops started in early February. As normal I tend to sow far too many needs, which I prefer to do rather that buying small plants later on in the year, with the exception to Garlic, Strawberry runners and a very hot Chili plant collection, containing Thai Dragon, Inferno and Tabasco.

    My little propagator has been well used over the years and always creates great results. This year it held: Carrots, Peppers, Serrano Chili's, Baby Sweetcorn, two varieties of Tomatoes (Moneymaker & Gardener's Delight) and Aubergines and small pots held Courgettes.

                                              Photo: Laura Lunt  Date: March 2011

    I grew these to a suitable size, before re-potting into smaller pots, making sure each plant had sufficient water to keep growing. Around late April - early May I started to harden these off, by placing them outside during the day and bringing these back in at night. After a couple of weeks of hardening, these were planted out into larger pots / vegetables containers, using multi-purpose compose and as an added water helper, I added a small spoonful of water crystals, which will soak up water and release slowly.

                                               Photo: Laura Lunt  Date: May 2011

    My Balcony is a south-east facing balcony, so it gets sun all morning into mid afternoon, but as a large part of this is covered I have to make sure that I water the plants daily.